What happens when a watermark crosses a sharp edge?
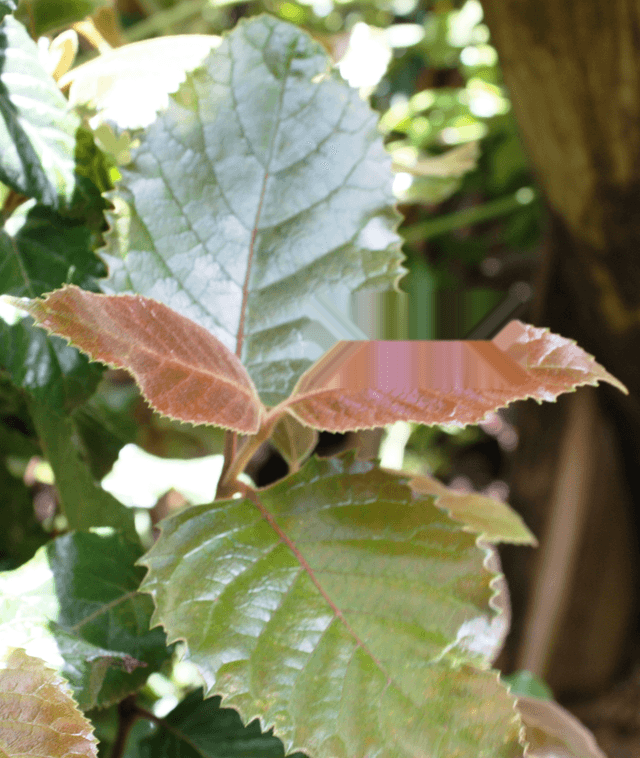
In our browser test, the painted letters disappeared, but the leaf boundary did not come back cleanly. The repaired area shows a broad smear of repeated colors. Cleanmark fills a selected region with nearby pixels; it cannot recover the covered original pixels.
Try the image watermark remover
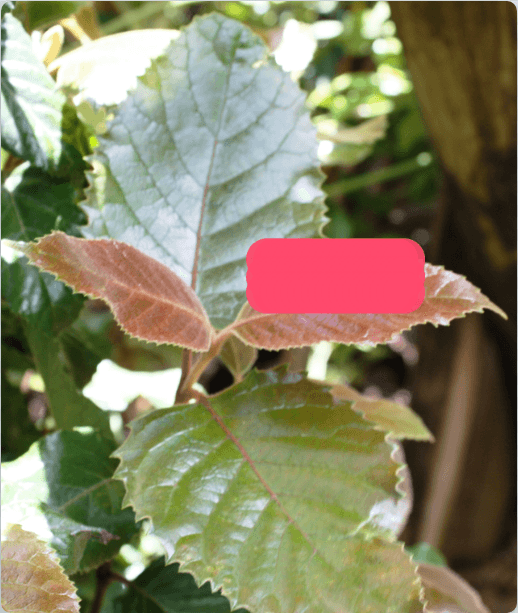
This is a controlled test on a real photograph, not a claim that the photograph originally carried a watermark. We added the visible “TEST” mark to an editable copy, painted over it in Cleanmark, and saved the tool's actual PNG output. Edit only images you own or have permission to change.

What we did
We used a foliage photograph released to the public domain by Abu Shawka. We resized a copy to 640 × 758 pixels and placed a clearly artificial “TEST” label across a light leaf and a dark area. We then loaded that copy into Cleanmark's existing homepage editor, made three brush strokes over the label, selected Remove, and downloaded the PNG. The input, selected mask, and downloaded output above are from that run.

The result removed the label's legible strokes. It also spread neighboring pink, orange, and dark tones across the selected region. Where the original leaf had a defined boundary, the output has a soft block with little of that shape left. This visible failure matters more than the missing letters: a viewer can still notice where the edit happened.
Why the edge breaks
Cleanmark's current brush repair copies information from neighboring pixels into the region you select and blends the result. A sharp boundary needs information from both sides in the correct shape. Once the selection covers that shape, nearby colors alone cannot tell the tool exactly where the hidden boundary ran. This page reports what this particular test produced; it does not measure every photo or every watermark.
When to try it, and when to stop
A small mark on a plain area gives the brush a simpler neighborhood. If a mark covers a face, object outline, fine text, or detailed texture, review the preview closely before saving. You can make a tighter selection and try again, but changing the mask cannot reveal pixels that are no longer visible in the input. If preserving that boundary is essential, obtain an unmarked original from the rights holder or choose an authorized source image.
The Cleanmark image tool runs in your browser without uploading the image. It accepts PNG, JPG/JPEG, and WebP, processes one image at a time, and exports PNG. Images with a longer side above 2400 pixels are proportionally resized before repair. The controlled copy in this test was smaller than that threshold.
Questions about this result
Did Cleanmark restore the original leaf?
No. The actual downloaded PNG shows a smeared patch where the label crossed the edge. Removing visible letters and restoring the hidden scene are different outcomes.
Was the input photo already watermarked?
No. We added the “TEST” lettering to a public-domain photograph so that the input, mask, and result could be shown together. This is a controlled example, not proof of performance on someone else's existing watermark.